Tuesday, October 24, 2017

Do I scan the negative or do I scan its print?


At Carterworks we scan and digitize thousands of colour photographic prints, slides and negatives.

When it comes to digitizing colour photos from certain eras it is better, if possible, to scan the negative. Why is this?  If you scan a colour print and compare it to a scan of the negative used to make that print you will notice differences between the scans.  This difference is particularly obvious in prints and negatives produced circa 1980s - 1990s.  These differences are not due to scanner settings or the type of scanner.  We know this as our systems are colour controlled.  To illustrate this point we scanned negatives and their corresponding prints from our own collection.

What we found:

1. Scans taken from original negatives have a greater colour range than the scans of their corresponding colour prints. Some of this difference can be explained by the limitations of print technology and inks at the time of printing; the remainder can be attributed to environmental exposure and the unstable nature of colour photography.  Another reason is the addition of black in the shadows at the time the print was made. Black was added to  made the print images look sharper but this  means information and colour is lost in the shadows.  The negative does not have this loss of detail.


Scan from original 1990s negative

Scan from original 1990s print.  Use of black
in the shadows reduces photo information.
The photo scan has a pink colour cast


2. Prints often have a distinctive colour cast.  This is caused by a mechanism employed by the chemical photo labs in the past to "improve a photo" which was to add a wash of whatever the dominant colour was in the image being developed.

We first discovered these differences when we scanned in a series of photos we took in the early 90s of  Art Deco buildings in Napier, NZ.  At the time the images were shot many of these buildings were predominantly painted with a soft pastel neutral background of white or cream and colour was used to pick out the building decoration. We noticed that a lot of our prints of these buildings had a colour cast which was in the same colour range as the buildings trim.  However this colour cast could not be seen in a scan of the corresponding original negative. These colour casts are obvious when compared to the original scan of the corresponding negatives, see examples above and below..


Scan from original 1990s print note the blue green colour cast

Scan from 1990s original negative

      
Scan from original 1990s negative
Scan from original 1990s print note the blue colour cast


What if you only have photos? 

This is not a problem.   We will produce a high resolution scan of your photos, remove the dust and scratches, correct any colour casts and any photographic print texture using Photoshop and other specialized editing tools as we have done in the restored example below....

Original photo no negative available with
red colour cast.
Final image corrected in Photoshop


Copyright Carterworks

Friday, May 26, 2017

LOOK BACK OVER KELBURN NORMAL SCHOOL’S FIRST 100 YEARS!

I am pleased to annouce that Kelburn Normal School's Centennial history book is now available. Jo from Carterworks was responsible for image digitisation, restoration and retouching.


LOOK BACK OVER KELBURN NORMAL SCHOOL’S FIRST 100 YEARS!
Kelburn Normal School - Celebrating 100 Years is a brand new 150+ page, fully bound, hard-cover photographic book charting the school’s first 100 years (1914-2014).
Using previously published historical information, newly sourced personal memories from some of the thousands of pupils who have passed through its doors, and hundreds of photographs from the school and national archives, it’s a fascinating look back at Kelburn Normal School.   
The book is chock-full of images of the school and its pupils from the past 100 years. Is your child, parent or great/grandparent within its pages? Many have already found theirs!
Priced at $70, the Kelburn Centenary Committee is selling the book at cost, with no profit for the school. Postage ($7.50 in New Zealand) is additional, or books can be picked up from the school’s office for free.
28th June: A new shipment of books has just arrived so if you have not already ordered now is a good time to place an order at https://www.kns100book.co.nz/
We hope you enjoy looking back over the first 100 years of Kelburn Normal School.


Saturday, May 6, 2017

Unusual marks on an old photo

Recently I was asked to restore a photograph that had some unusual fine white pin marks on each corner.   I have not seen these types of marks before....

The full restored photo

Enlarged pin mark


The marks remind me of crop marks used by print designers when laying out publications either to indicate page edges or where to crop an image. I am wondering if these marks were added by the photographer to assist the picture framer. So far my research has not been able to confirm this. Have you seen this on any of your old photos do you know what these marks indicate?
Copyright Carterworks NZ

Sunday, April 9, 2017

Wonderful wedding photos

Wedding photos are always wonderful!

In the last couple of weeks I have restored a number of Edwardian wedding photos for different clients.  The images featured in this blog show an extended family as well as the bridal couple on the verandah of the family homestead....


Below are the faded originals which contain multiple fine scratches, stains, spotting etc. The real challenge with a restoration like this is to remove the damage while retaining the detail of the dresses.


Copyright Carterworks NZ


Friday, April 7, 2017

Saturday, March 25, 2017

Scanning Lantern slides

19th Century Magic lantern
 projector Wikipedia


Some time ago a client approached me about digitising a collection of early lantern slides.  Lantern slides are squarish glass slides that contain a mounted photographic transparency and are designed to be displayed in a magic lantern projector. Magic lantern projectors date back to the 17th Century and use a concave mirror at the back of a light source to direct the light through a lantern slide onto a lens which is adjusted to display the image on the slide onto a wall or screen.  Early lantern slides were hand painted images, then later the slides were printed using either photographic or photomechanical processes.


Lantern slides are positive images made from a negative. The image is mounted on a glass plate and covered with a glass cover which is taped at the edges. Lantern slide shows were either for entertainment or educational purposes. My client's slides dated from the 1920s and were black and white photographic images her Grandfather used to illustrate a presentation he made to the Nelson Literary Scientific and Philosophical Institute.  The slides and talk were about the hill tribes of Assam in north east India where he lived for some years.


Oridinary scan of image captions
Scanning the slides involved a two stage process - a reflective scan to record the image surround which contained important image captions and a second transparent positive scan.  In the second scan the scanner light is transmitted through the slide in the same manner as a magic lantern. The combination of shining light through the slide; the fact the slide sits directly below the scan head with no additional scanner glass and the auto focus function, enables a very clear high resolution scan.  Lantern slides are encased in glass so it is important to identify the emulsion side to get a clear scan.  Like glass plate negatives Lantern slides need to be handled carefully with gloves to avoid fingermarks and breakage.


Slide Scan
Final image


Final image
Final image


Copyright Carterworks NZ

Friday, March 17, 2017

Chemical damage of photographic prints


Sometimes I receive photos to restore that have suffered from chemical damage and it is one of the reasons why it is so important to capture a digital copy of a photo before it deterioates further. Chemical damage includes a whole range of reactions - two common ones being silvering out and sulphiding.

Silvering out is caused by chemical breakdown of the silver used to form the image in 19th and 20th century photographs.  The silver reacts with atmospheric contaminants such as hydrogen sulphide and peroxides leaving a bluish or green tarnish in the darker areas of the photo....


Scan by Carterworks showing silvering

Sulphiding is where this reaction causes the photo to change from black to brown and create overall fading.


Scan by Carterworks showing sulphiding

Over time these chemical reactions lead to a loss of photographic information or unsightly distortions and marks on the image.   Luckily both these images were captured in time and have been restored by Carterworks.


Restoration by Carterworks


Restoration by Carterworks


The National Gallery of Australia recommends that photos should  be displayed away from direct light, ideally behind UV glass and in temperatures of around 21 C and with a relative humidity of 50%.  They also recommend that photos

be mounted and framed or interleaved and stored with archival quality chemically stable acid-free plastics such as polyethylene, polypropylene or polyester. Archival paper products should be neutral pH, unbuffered and lignin, sulphur and peroxide free. One sure way to determine if something is archival quality is to check if the material passes the American National Standards Institute Photographic Activity Test (ANSIPAT) .

Source:http://nga.gov.au/conservation/prevention/photos.cfm

In NZ you can get these archival storage materials for your photos and documents from:-

Conservation Supplies (online and in Havelock North) http://www.conservationsupplies.co.nz/
Port Nicholson Packaging in Wellington   http://www.pnp.co.nz/archival-storage/

Copyright Carterworks NZ

Wednesday, November 30, 2016

Photo manipulation before Photoshop


Below is an example of an albumen carte-de-viste composite print which features in the Graphis Atlas Interesting Picture of the Week. This image was created using a masking technique which has the allowed studio photographer to superimpose a new background around the sitter.


"The photographer created a mask for this negative and for the negative of the sitter then combined the two images during printing. This technique was perfected by Daniel and David Bendann of Baltimore in 1872. Their patented method of compositing portraits with scenery was known as "Bendann Backgrounds." For more information about these types of prints
check out http://graphicsatlas.org/guidedtour/?process_id=12

Sunday, April 24, 2016

A personal ANZAC story


Over the last few years I have scanned  First World War photos, memorabilia and diaries for others. These are very special family items.  Today I want to share my own personal ANZAC story.....

Auckland Public Library Collection
Scanned print from family collection
Like many New Zealanders I had family who went to Gallipoli as young men.  My Grandfather returned, sadly his older brother Guy did not. I was prompted to start research into my Great Uncle's story by a trip my son took to Europe, where he saw Guy's grave at Gallipolli.

My family held papers showing the location of his grave and a photo which I digitized and restored. I found information from the Auckland Museum Cenotaph database and obtained his war records from Archives NZ. My Great Uncle served with the Auckland Mounted Rifles. I found another photo of Guy in the Auckland Public library photographic collection that was similar to our family one.  As this photo was only partially identified, I was able to give the library his details.  


More recently I uncovered additional family information including his First World War diary, which ends the day before his death (less than a month after his landing at Gallipoli) and a Scrapbook of condolence letters and telegrams sent to his family following his death.                                      


I have digitized and produced facsimile copies of both the diary and the condolence book and photos. Digitization has enabled me to share these items within the family. Recently our family shared these at a commemorative service that was held at the local church my Great Uncle and his family belonged to. Following the service, descendants of the original letter writers were a able to view the letters in the scrapbook.  These items have given our family some understanding of the devastating impact that this had on Guy's family back in NZ


Tuesday, January 12, 2016

A brief history of Portrait Photography

Recently DigitalRev published an interesting little video which summaries the history of portrait photography in 90 seconds - see the following link:

http://bokeh.digitalrev.com/article/a-simple-history-of-the-history-of-portrait-photography-in-90-seconds

Friday, December 4, 2015

More on photo editing before Photoshop

In a number of posts I have talked about photo editing in pre-photoshop times.  A recent article in PetaPixel talks about how editing was done - quoting an early photographer...


Tuesday, November 3, 2015

Photo manipulation before Photoshop at the Met

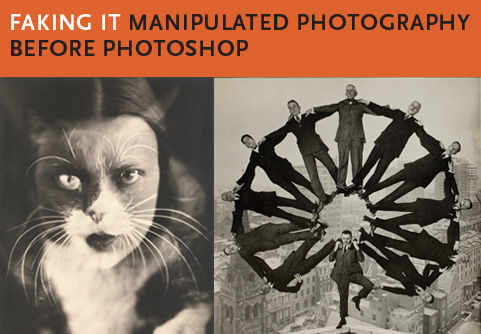
A couple of years ago I read a really interesting book called "Faking it: Manipulated photography before photoshop" by Mia Fineman which also was the basis for a Photography exhibition held at the Met. I was reminded about this when I saw a recent post in PetaPixel.com.

"Faking it" describes the art of photographic manipulation before Photoshop and shows that photographic manipulation started very early on in the development of Photography.  


 Faking It: Manipulated Photography Before Photoshop

Mia talks about seven different types of photo manipulation which are designed to:
1. correct faults in the original photograph and to compensate for the limitations of photography (the example in the article below from PetaPixel falls in this category)
2. create "art" photographs
3. persuade people - for political and ideological reasons
4. amuse and entertain - "novelty" photographs
5. represent images for print
6. create surreal dreamlike images and
7. deliberately change the photographic image (using modern manipulations and composites pre-Photoshop) - she calls - Protoshop....
Its a fascinating read and shows that photographic retouching and manipulation is not new - its a real skill the requires a eye for detail and understanding of proportion, composition and anatomy and patience to re-create reality, its just the tools have changed .....


For those of us who live down-under the Met has put the entire exhibition online at:       http://www.metmuseum.org/exhibitions/listings/2012/faking-it 


Copyright Carterworks NZ

Friday, February 20, 2015

Why not all scanned images are created equal


Recently I was reading the magazine section of a newspaper and was surprised by the poor quality of some of the images in an article I was reading.  The images were blurred in parts and had lost resolution and information, I suspect due to the fact that they were never scanned properly in the first place, that is, the resolution they were scanned at was not sufficient for publication.

A lot of people think that scanning an image just involves putting it in a scanner and pushing a button - easy-peasy - so why pay someone?

The answer is its not just a matter of having good scanning equipment - its knowing how to get the best out of your equipment, the right settings and the right resolution for the purpose.

Before I scan I analyse the image to gauge things like its detail and also damage.

I ask:

  • What do you want to use your images for?
  • Do you think you might want to print them in the future?

I also consider:
  • What is the best digital format. If they are colour images for example, I want to try and capture as much of the colour as possible
  • If they are damaged.  I want to give people the option of being able to fix them, if not now  - maybe in the future.
Scanning is also about knowing the best format to save your digital images for the future.  So if you have a collection of slides, negatives or photos call me because I can help you with your scanning needs.


Friday, January 23, 2015

Ashwini Chaskar and the Craft Gallery

Another local Wellington artist I have had the privilege of working with is Ashwini Chaskar. Ashwini produces beautiful digital water and batik effect images as well as detailed black and white ink works.  Ashwini  approached me to print these for her when she sells her images on the Craft Gallery - a new online Gallery featuring works of Australian and New Zealand artists.


See more of Ashwinis work at:


And on facebook 


Sunday, January 18, 2015

Organising those summer snapshots


Source :wikipedia
So you are back from the Christmas holidays with a pile of snaps....

Hopefully you have downloaded them onto your computer and backed them up in the cloud or elsewhere.   And you filed them so you can easily find them?  Maybe you haven't? Are they still sitting on the camera?.

Whoops!.......

Well its the new year, there is no time like the present to get organised!

There are many different ways of organising your digitized images. Our personal collection of digitized images consists of scanned negatives,slides and photos as well as digital photos, videos, and movies plus we have music sound recordings. We chose to place our digital data into folders based on the date they were taken/ recorded, then into sub-folders based on subject. The date folders are named based on the year and month they were taken. Our file folder notations look like this:-


201401
201402
201412
201501
  
2014 indicates the year and the suffix  01, 02 and 03 indicates the month - January, February, March etc.Using a number based system like this means that the files will automatically sort in chronological order.

Within each date folder individual images, recordings and movies are sorted into sub-folders which are given topic or event names based on their subject matter, for example: Johns birthday, Beach trip, Flowers in the garden.

This system allows us to continue to add to it using the same notation. As we scan older images they can slot in at earlier dates....newer images under later dates....

How do you organize your digital images and data?  Share your ideas under comments....
  

Monday, November 24, 2014

Reproducing original artworks for Nicky Kane


This year at Carterworks we have had the privilege of producing a range of giclee prints for local Wellington artists. Giclee prints are high resolution archival prints. Nicky Kane is an established Wellington based multi-media artist. Nicky asked me to reproduce one of her paintings as well as a pen and ink work of a native bird that she will be offering for sale.  As an artist I understand how important it is to reproduce colours accurately as close as possible to the original artwork. I was able to work with Nicky to achieve a print result that captured her stunning original. 

Diamond by Nicky Kane
Giclee Print on Epson Hot Press Bright Paper 
You can find out more about Nicky's work for Brave Art here :
http://www.braveartnz.com/nicky-kane--bette-cosgrove.html

You can contact her and see more of her inspirations and art work on her facebook page, Taking Issue, here:
https://www.facebook.com/pages/Taking-ISSUE/676687949073090?ref=profile


Monday, August 18, 2014

Photo preservation and digital restoration references


On the 18th of August I gave a talk to the Wellington Southern Bays Historical Society in Island Bay about Photo preservation and digital restoration.  I thought it might be useful if  I put all the references I gave out in the talk in one place:

Where to get archival storage boxes and enclosures in NZ

Port Nicholson Packaging in Petone:

http://www.pnp.co.nz/

Conservation supplies in Havelock North

http://www.conservationsupplies.co.nz/

General archiving information

The practical archivist blog has useful information about archiving and sorting your family photos and heritage items

http://practicalarchivist.com/

Both archives NZ and TePapa have information on their sites about sorting and looking after photographs


Useful references for dating photographs

For photographic processes  http://www.graphicsatlas.org/

Also Gawain Weavers' site contains a very useful chart which you can use to help identify the photographic processes employed in 19th Century Photographic prints

http://gawainweaver.com/processID

For NZ photographers since 1840 - the photographic database link is:
RogerVaughan  updated reference to this site 
http://www.cartes.freeuk.com/dec/dated.htm
Some links on clothing styles and fashions
http://www.fashion-era.com/Dating_Costume_History_Pictures/how_to_date_photographs_top.htm

Friday, June 13, 2014

Kelburn Normal School Centenary digitisation and display project

Visitors to this blog will have noticed it has not been updated recently. As well as client projects, I have been digitising of Kelburn Normal School's photographic collection in time for the school centenary which was held in May this year. The Centenary turned out to be a great event with 300 attending on the first night and many more on the Saturday for official opening, viewing of displays, and entertainment.  On the Sunday some returned to take a more leisurely look at the photos.

Kelburn School has an impressive photo collection ranging from formal class and sport photos, to music and drama, events and happenings over the years, plus images of the school and teachers.  To date Carterworks has scanned over 1300 images and that is only to 1998! (It excludes documents and photo key notes).

Over 30 people sent in photos many using the Carterworks file uploader to load images from around New Zealand, Australia and England....so even those who could not make it on the day could contribute. 

From past experience with reunions I knew that having original photos on display was not a good idea, partly because many of the photos were small and secondly photos are fragile and can get damaged. As all the images had been archived scanned to international standards it was easy to convert and enlarge them on to A4 sheets for display.  Admittedly the schools printer was kept busy for 3 to 4 days!  The prints filled over 40 square metres of display area.  The boards were placed in 6 classrooms around the school for the main open day and in the hall on the Sunday. There were so many images table tops and walls were also used..  

Below are some shots of people enjoying the photo displays on Saturday.


The photos were enjoyed by all ages.


The larger prints allowed people to identify themselves in the photos and this started many discussions....


Photo Boards in the hall on Sunday - which gives some idea of the extent of the collection.


The work continues....
From 1998 onwards the school had class photos on display in the school hallways and stairwells.  Those photos not in a digital format (from the late 1990s to 2008) will be digitised over the coming months to complete the project.....

Copyright Carterworks NZ